

[[ Want to know how to take nice, clear pictures? ]]
In this post I'll cover: Backgrounds, lighting, ISO settings, white balance, shutter speed, apertures, macro shots, correcting common problems, photo editing, DSLRs and image formats....
Everything under the jump!
Backgrounds
My pet hate when I look through blogs is seeing a well composed, well lit photo of a product taken on a busy, garish, bright background - it doesn't work! Yeah, it might be pretty, but it's also distracting. You don't have to spend much on getting a nice background either, just open a plain sketchbook (mine was 99p from The Works) , rest the back against a wall and place your product on the book. If you're taking a picture of yourself, use a plain wall. Easy! I prefer light colours over dark since they 'bounce' light back.

[[ Patterned background vs. plain background - which looks best? ]]
Composition
Composition is basically where you place your product/ subject in your photograph. An easy way to get a nice composition is by using the 'Rule of Thirds' AKA the 'Rule of Nine'. All you have to do is imagine that through your view finder you can see a grid of nine sections, 3 x 3. Place your product so that it sits where two lines meet. Why? Because eyes will instantly be drawn to the product since it isn't central - don't ask how, it's just how the brain works. Also, it's just more aesthetically pleasing.You can see some great pics and a full explanation of the rule of thirds here.Lighting
It goes without saying that natural light with no flash is the best, but if you're lacking natural light flash is an option if you know what you're doing. I try to angle the camera so that the flash is not directly in line with the product, so that I don't get a harsh patch of light bouncing back off the product. It can take a few attempts, but it's worth a try! Sometimes I place two reflectors either side of the product so that if I use flash, shadows are eliminated and the lighting is even. I usually use flash for pics of myself, which generally is a big 'no no', but I like the effect. Colours look more vivid and textures even out. Most people recommend standing in a window and not using flash, which is better for a more natural look.
[[ No flash, flash, flash + reflectors ]]
Settings
It's useful to be able to switch to manual and alter your camera setting because sometimes the 'auto mode' choices (like macro, sports mode, portrait, low light etc) just don't cut it. I rarely use auto modes now and honestly forget they're even there these days!White Balance - White balance settings 'balance' the colours in your photos in accordance to which areas are true primary shades/ true whites. There are usually auto settings such as 'Sunlight, Tungsten, Natural Light and Snow' which you can choose according to the type of light you are using. There are also easy ways of correcting it using photo editing programmes, which usually just involve clicking on 'White Balance' and then an area of true white on your image.
ISO - I usually call ISO 'Light Sensitivity', because that's precisely what it is! The higher your ISO setting, the more light your camera will respond to, the brighter your image will be. So if you're shooting in low light, crank up the ISO a little. If you're shooting in bright light, take it down a few notches. It's also worth pointing out that the higher the ISO, the grainier the image will be, so try to use the lowest ISO you possibly can for the lighting you are using.

[[ ISO 100 in low light - grainy and dark ]]

[[ ISO 1600 in low light - brighter and sharper. I'd brighten it further through editing. ]]
Aperture Value/ AV - This refers to how large the aperture (the opening in the lens) is. The larger the aperture, the brighter the image will be and visa versa. I usually keep mine the same size and alter my shutter speed to accommodate for it. High aperatures show as a low number - so 5.6 is larger than 9 etc.
Macro - Macro is a beauty bloggers best friend! Usually depicted as a flower, this setting allows you to take close up shots without losing any sharpness. It's great for swatches, close up product shots and close up eye makeup shots.

[[ Macro of some falsies. ]]
Common Problems
Blurry Pictures - Pictures can blur for a multitude of reasons but it's usually just down to a shaky hand! You can get super cheap tripods from eBay, or just use self timer and balance your camera on a pile of books/ your desk/ a shelf. Other reasons could be that your shutter is open for too long - take it down a few.Grainy Pictures - Usually down to incorrect ISO settings, try taking your ISO down and raising your aperture size a touch. It could also be because you are using a camera with a very low amount of mega pixels - in general, the more mega pixels, the better the quality of photos. About 5mp is more than adequate for close ups and larger shots. There is NO NEED to buy a camera with more than 5mp unless you plan on printing images bigger than A4 size!
Pictures too Light/ Too Dark - Again, ISO is usually the culprit, raise it is your pictures are too dark, lower it if they are too bright. Aperture size could also be a problem, raise it if your pictures are too dark, lower it if they are too bright. Remember that ISO and aperture relate to each other, so if you change one, you might need to change the other.
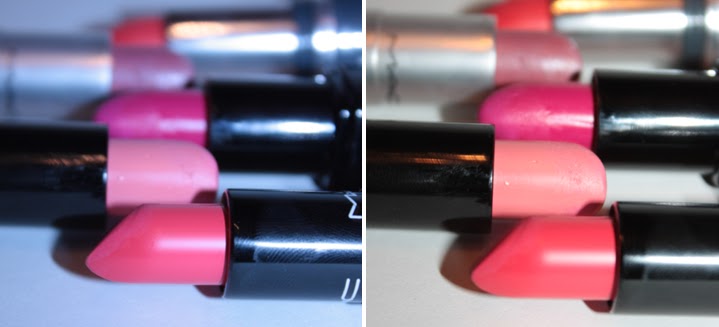
[[ Incorrect white balance/ correct white balance. ]]
Other Stuff
What camera do you use? - I use a Canon Eos 450D with a standard 18 - 55 lens. I don't actually own a compact digital camera!Should I buy a DSLR? - If you're only going to use it for blog pics, family events and parties - no. There is absolutely no need! You can get decent point and shoot cameras for less than £100 with everything you need built in to them. DSLRs are for professional photographers and true photography enthusiasts. It irks me when I see people with £500 worth of camera and not a clue how to use them.
Do I need photoshop? - Well...if your friend can copy it for you and it's going to cost you nothing them by all means, get it! But it really isn't worth spending so much on editing software for basic touch ups. You can download free ones which do the job just fine - I use Photoscape, which is free and ridiculously easy to use. If anyone is interested I'll do another post about super basic photo editing using Photoscape.
What are Reflectors? Do I need them? - Reflectors are pieces of material stretched over a frame which bounce light from the flash or outside light sources onto the subject to brighten it/ get rid of shadows. They can also be used for portraits to soften lines and generally brighten the face. You have to play around with them a bit to understand how they work but it doesn't take long at all! You can get them for cheap from eBay, or even make them yourself using a simple frame with fabric stretched over it.
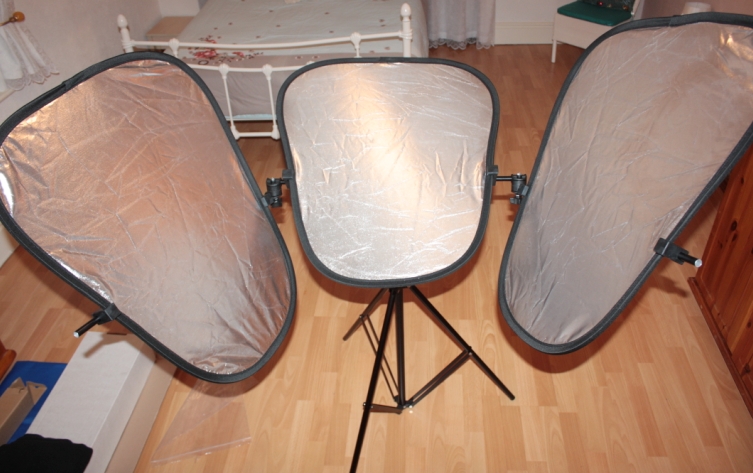
[[ My three reflectors attached to their stand. You only need a stand for portraits, I barely use it. ]]
What format should I save it in? - JPEG will do just fine. You don't need to save it in RAW - you don't even need to shoot in RAW, it take up far too much memory and only pros need it, really. I recently started saving close ups in Bitmap since it doesn't compress the image as much as JPEG.
Right! I think I've just about covered all bases! If there's something you don't understand or something I've missed out then please feel free to ask :) It might look like a lot to absorb, but just keep playing and it will become second nature! Remember - how good a photograph turns out is about 20% the camera itself and 80% how you use it.
This is such a great post, and so helpful! Definitely will check back on this when I next do a post :) Thank you!
ReplyDeleteGreat post, this really helped me. :)
ReplyDeleteExcellent post :D I'd definitely be interested in a Photoscape tutorial - it's not one I've really used before! x
ReplyDeleteoooooooooooaaaaaaa thank youuuuu for this post, really helpful :) now i just need to check if i can change iso/etc manually with my cam o.O
ReplyDeletewow amazing tips!!thank you for the detail! please do a post on photoscape ;) xxx
ReplyDeleteLove this post. It would be nice if you included which camera you used for taking the pics as well.
ReplyDeleteI bought a Canon G11 at the beginning of this summer because I was traveling, so I was happy with my purchase, but now that I'm back I'm thinking of selling that and getting a smaller camera.
http://saimese.blogspot.com
great post thanks so much for this it was really helpful x
ReplyDeleteThanks for this :) I'm also trying to find ways of making my photography better, i'm such a perfectionist! I've heard of the rule of 9 but never remember to actually use it so it's something i'll definitely be trying out :)
ReplyDeletexx
Wow. This was brilliant. Very in depth post! thanks so much for sharing your knowledge.
ReplyDeleteI did the same..trial and error. I'm no where near perfection but we are all learning I guess.
When you mentioned reflectors..do you mean mirrors?
XXX
omg thank you!! my hubby bought me a Sony Alpha camera (SLR type) coz I LOVE background defocus, macro etc type pictures but in all honesty I dont make use of it 100% and all its features so thank you for blogging about this and in a basic way so I can understand!!
ReplyDeleteOne problem I have though, that I hope you can help with, I usually take my pics/blog at night, and we have those horribly yellow toned energy saving lights, so how do you counteract that orange/yellow glow? ISO?
thanks again, great post!!
<3
Try setting your white balance to Tungsten see if that helps.
DeleteMelissa
www.Mahogany-Closet.com
Great post! I am sure many bloggers will be able to make use of your tips :)
ReplyDeleteI love your photography posts! And you, LOL for suggesting Photoscape. I just love it and it has made a world of difference for me. Btw, what are reflectors and where can I get them? :-)
ReplyDeleteWow! What a great post! I have bookmarked it :)
ReplyDeleteXOXO
Michelle
www.hardcoremakeupjunkie.com
I ballsed my camera right on up after taking advice from another blogger but your post is brilliant, I see where I've gone wrong now and can easily fix it, thanks!
ReplyDeleteAlso, I totally agree with you on the busy background thing..I have done it a few times on my blog but not recently..and I find that although the busy background looks nice, it draws my attention away and can make the colour of the product look off, e.g. the bottom nail varnish looks deeper in the first pic than it does in the second.
LOVE this post doll!! :)
ReplyDeleteKaushal xx
I've just picked up my camera and sorted out the problem, my photos were coming out way too dark and also with a blue tint..thank you! x
ReplyDeleteMega helpful. Thankyou!
ReplyDeleteThis post was insanely useful. Thank you so much!
ReplyDeleteok, i have done all of these mistakes mentinoed before lol. Thank you for your post, i will certainly change my "routine"
ReplyDeleteThis is very helpful, you always have beautiful pictures. xD
ReplyDeleteGREAT POST!!!!!! Thanks so much for the tips.
ReplyDeleteCool post!! :-)
ReplyDeleteThis is really helpful. :)
ReplyDeleteThanks.
wow that was really a very helpful post! thanks :)
ReplyDeletehttp://obsessiveness4makeup.blogspot.com/
I absolutely adore you for this post. My biggest hiccup with blogging had been the photographs. I actually tried your tips and it really works. Thank you so much..
ReplyDeleteThanks. I use a cheap soapbox of a FujiFilm Finepix AV 100 to take my blog pics and am quite happy with it (since I know no better :D)
ReplyDeleteBF's big fancy one is terribly intimidating. I'd like to read more about Photoscape, I've been editing my pics with Paintbrush so far...
So.informative.and.helpful O______O
ReplyDelete@ EVERYONE! Thank you! I'm so glad so many of you found it helpful, I wasn't sure if I'd end up rambling and going too in depth haha. Let me know if you have any more questions!
ReplyDeleteI'll do a Photoscape tutorial as soon as I can!
@ Saimese, what I use is now included :) Canon Eos 450D, standard 18 - 55 lens.
@ Mercedes, reflectors are reflective fabric stretched over a frame. They're great for evening out light/ getting rid of shadows :) I've included a picture of mine in the main post now.
@ Esteeem, if your pics are coming out with strange colours, that would be down to the white balance :) If you can find 'Tungsten', 'Indoors' or 'Fluorescent Light' white balance settings on your camera that should help.
@ Susan, ahaha, I always recommend Photoscape! I've included a section/ pics about reflectors in the main post now :)
@ Rhamnousia, agreed! Busy backgrounds are such a pet hate of mine. 'Oooh that's a nice nai - look at the patterns! Pretty patterns!'
i have a question if i may lily. Just thought about it just now. I have a silly little camera, which does point and shoot. there is a night time setting on it which i love cos it makes the light lovely and soft. So when you're in a bar with candles and what not, you can still take a photograph, but the lighting is lovely and soft. But I need to be absolutely still like hell to be able to take a non blurry photoo. I am able to change the settings for this setting but i don't know which one. Which setting (is that the ISO) do i need to change so that the photo is still soft but that allows me not to have to be dead still and that the photo doesnt come out blurry? thank you xx
ReplyDeletethank you! found "fluorescent" WB settings and it seems to have done the trick.. you're the best!
ReplyDeleteAs for busy backgrounds... omg me tooo, hate em, they're sooo distracting >:(
thanks again =)
<3
@ Liloo, that would be the shutter speed or 'Time Value' setting...however, if it's in an auto mode, usually the camera picks everything for you and you can't change it. If you can, change the shutter speed so that it is faster :)
ReplyDelete@ Esteeem, whey! Glad it worked!
Great post!
ReplyDeleteAwesome post! I have been fighting with my camera and pictures lately. Thanks so much :)
ReplyDeleteThis is a brilliant post. Especially helpful this time of year when there very little natural light. I've bookmarked your post for future reference. Ta very much!
ReplyDeleteVery helpful! Some things I knew and others I didn't! Thank you so much for writing this up.
ReplyDeletegood tips :) i actually like it on the printed background though :P it's prettier!
ReplyDeleteExcellent post, I have been learning as I go along. Still plenty to learn though, I particularly found the information on ISO and reflectors very helpful :)
ReplyDeleteJane x
Wow, this is an incredible post! the only thing that really irks me about my camera is I have to have it on super macro for close ups NOT to be blurry (I use a fujifilm finepix s5000) and if it moves one TINY bit, the whole picture is blurred so my close ups end up crap. So my question is do you use a tripod for your closeups as well?
ReplyDeletethanks again for this x
@ Nats, ah, I used to use one of the Fuji Finepix cameras for work and had the same problem. See if you can heighten the shutter speed first, that might work. Otherwise a tripod is a good idea, you can get little bendy desk ones for a few quid off eBay. I very rarely use a tripod for anything!
ReplyDeleteI loved this post, thank you lovely!
ReplyDeletexoxo
Really helpful post and I'm very glad that you posted this on the #bbloggers chat. I did A-Level photography but they teach you diddly squat so it's far better to experiment and see what people actually do.
ReplyDeletevery helpful post, but I want to know more about videos :D
ReplyDeleteFantastic post, I just realised why my picture's tend to have a blueish hue, I had no idea there was a white balance setting on my camera! Thank you so much!
ReplyDeleteThis was soooo helpful! Would love it if you could do a tutorial on using Photoscape!
ReplyDeleteThanks so much for this post. It was very helpful. =)
ReplyDeleteYeh I need to consider how I compose my images but this post is great :D
ReplyDeleteThis is such a great post! Helps me loads :)
ReplyDeletelana-sultana.blogspot.com
I just want you to know that several years later, this post is still very informative.
ReplyDelete